Showing posts with label dessert. Show all posts

Saturday, February 25, 2012

1st Birthday Cake for a cute birthday boy


Do you know what a smash cake is? Recently I have been to a lot of 1st birthday parties and one of the new trends is to have a special cake for the birthday boy or girl to "smash" apart and eat.

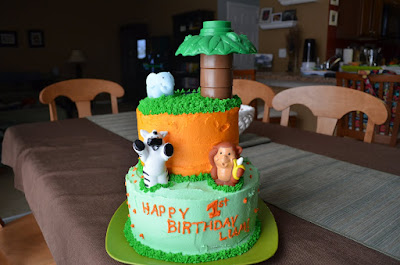
When my friend asked me to make a jungle themed birthday cake for her son's first birthday, I put together this fun cake and also made a small smash cake for the birthday boy!

The assembly of this cake was easy. The bottom layer was made by stacking two 8 inch rounds. The top layer was made by stacking two 6 inch rounds.I did use dowels in the bottom layer for some extra support since the cakes were so dense. The smash cake was a single 6 inch cake. The filling was chocolate buttercream and the frosting was regular buttercream tinted with wilton gel food coloring.

Thursday, February 16, 2012

Chocolate and Raspberry Goodness

This past weekend I made this yummy and delicious treat (cake?? torte??) to bring with to dinner at our friends home. This deliciousness was inspired by the cover photo on The Best of America's Test Kitchen magazine last month. When I saw it, I knew I had to give it a try!


I'm not much of a baker, I really prefer making savory dishes where I don't have to be as exact with my measurements, but it just looked so darn good that I had to give this a try (adding in a few changes to make it my own!). I think that everyone agreed that it tasted pretty good (in fact both of the guys had seconds!).  I think that this is the perfect dessert for a dinner with friends or celebrating Valentines Day!

Here is how I tackled the recipe.....

First I gathered all of my ingredients:


Those are toasted sliced almonds (just put them in a dry pan for a few minutes to toast them up).

Then I melted the chocolate and butter in a double boiler (just a glass bowl set over a pot of boiling water). I did this step first because the chocolate had to cool off before being mixed with the eggs and other ingredients. Also, if you attempt this recipe make sure to use your largest glass bowl for this step, because you will mix the rest of your ingredients into this bowl towards the end of the recipe. When the mixture was melted, it was smooth and glossy.


While this mixture was cooling off I cut parchment paper for the bottom of my cake pans:

Do you know the little trick that you can use to make perfect rounds? Just fold the paper in half and then in half again (it should be a square). Then fold the two loose edges of the square together to make a triangle and fold a second time to make a smaller triangle. Then trim the end of the triangle until you have the right size circles for your pan.

After setting aside some of the almonds for decorating the cake, I put the rest of the almonds into the food processor and ground them into a fine powder.


I then mixed in the rest of the dry ingredients (flour and salt) in a small bowl. I took a picture of the unprocessed almonds next to the almond-flour mixture so that you could see the difference in consistency.

Next, I whipped the eggs in the same food processor bowl (don't worry about cleaning it out, if a few bits of almond get left behind in the bowl, it won't matter!). To the egg mixture I added in the sugar until the two were mixed together well. 

Around this time, the chocolate mixture was cool (it had been off the heat about 25 minutes), and I added in a small amount of espresso powder and some vanilla. Then I mixed in the egg mixture and finally, I mixed in the almond mixture. The resulting batter was pretty thin and had a course texture from the ground almonds.


I split the batter between the two cake pans and baked them for 15 minutes at 325.

When the cakes came out of the oven, they looked dry and a toothpick came out cleanly. I let the cakes cool for about 90 minutes and then removed them from the pan.  


When the cakes were cooled, I made a filling by mixing some raspberry jam and fresh berries. I also melted some additional chocolate, cream and sugar in the double boiler to make a coating for the top of the cake.


I finished off by filling the cake, pouring the glaze on top and decorating with the extra almonds and some berries.


Ymm......let me just take a moment here......

........


As I said, I don't typically make a lot of desserts, and this was a big undertaking, but well worth the time that it took!

Recipe Recap:
Batter
8 oz bakers chocolate
12 Tbs butter
3/4 cup toasted almonds processed fine
1/4 cup flour
pinch salt
5 eggs
3/4 cup sugar
2 tsp vanilla
1 tsp espresso powder (if you don't want to purchase this item since you only need a little bit, you can skip it, but chocolate desserts usually taste more chocolaty when you add some coffee flavor in the background)

Filling:
1/2 cup jam
1 cup berries

Decorations
1 cup toasted almonds
Whole Berries

Glaze
5 oz bakers chocolate
1/2 heavy cream
2 tsp sugar

Melt the chocolate and butter over a double boiler. Process the almonds into a fine powder, mixing in the flour and salt. Whip the eggs in the food processor and then add in the sugar. Mix the cooled chocolate mixture with the vanilla and espresso powder. Then mix in the egg and almond mixtures. Divide the batter into two 8 inch bake pans and bake for 15 minutes at 325 degrees Fill the cake with the jam and berry mixture. Melt the glaze ingredients in the double boiler and pour over the cake. Decorate!
Sunday, February 5, 2012

Apple Turnovers


I have never worked with puff pastry before, but I had some apple pie filling in my freezer so I thought that I would give it a go.

Every fall, my hubby and I like to go apple picking, but its always hard to eat all the apples just between the two of us. Often I will cook and freeze some of the apples to use as apple pie filling or applesauce throughout the winter months. To do this, I cut and peeled 6 large apples. In a medium sauce pan I cooked the apples with a few tablespoons of water, a few tablespoons of sugar (more or less depending on the sweetness of the apples) and a teaspoon of cinnamon. I cook this mixture until the apples are soft, but not completely falling apart. You can either eat this right away as applesauce, or freeze for later. It also makes a great apple pie filling.

Today, I decided to use some of the frozen apple pie filling for these turnovers. You could use canned apple pie filling, or fresh apples, whatever you happen to have will work just fine.

Gather together all of the ingredients: the apple mixture, an egg, 2 sheets of puff pastry and some sugar to sprinkle on top (I used large sugar crystals, but you can use anything that you have).


Cut each of the pastries into 4 equal squares. Beat the egg and brush it over the inside surfaces of each square. Evenly divide the apple mixture between the 8 pastry squares. Fold over each of the squares and use a fork to seal the edges. Brush the egg wash over the outside of each of the pastry triangles and sprinkle with the sugar. Use a knife to poke a hole or two into each triangle to let any steam vent out.


Bake the pastry puffs for 15-20 minutes in a 400 degree oven. Let them cool for about 10 minutes.


Serve and enjoy!


Recipe Recap:

2 cups Apple Pie Filling
2 sheet puff pastry (cut into 8 equal pieces)
1 beaten egg
sugar for sprinkling on top

Place a small amount of the apple pie filling into each puff pastry square. Seal the edges of each triangle using a fork and brush some of the egg onto one. Use a knife to poke a hole into each triangle and sprinkle with sugar. Bake for 15-20 minutes at 400 degrees and let cool for at least 10 minutes before eating.


Thursday, December 1, 2011

Wedding Shower Cookies

One of my sisters got married this past summer and for one of her showers, my other sister and I made these cookies. I can't take any of the credit, my sister came up with the idea and I just helped execute, but they turned out so cute that I needed to share!!!

We tried to make a cake too....it fell apart....I mean literally fell apart.........don't know where we went wrong........

Wednesday, November 30, 2011

Beer Can Birthday Cake

For my husbands 30th birthday, I decided to put my cake decorating skills to the test. I looked around online for some ideas and found several different versions of a "beer can" cake.

Here is what the final version of the cake looked like:

My hubby really loved the cake and everyone who saw it was suprised that there was actually cake inside! It was really a lot easier to make than it looks. Just time consuming! I used a cake recipie from The Cake Doctor cookbook (I love this cookbook, every recipe that I have ever made comes out wonderfully!). I actually had to make a double batch and stacked the two cakes on top of each other. This was probably the hardest part of making the cake because I have never had to use dowels before in a cake, but needed to here because of the height of the cake and the fact that I had to transport it to the party (about a 30 minute car ride from my house....I aged about 10 years during this car ride....but thats another story). Since I had never used dowels in a cake before, I think that I probably overdid it. I think that I used 6 dowels.....anyone know if that was overkill????

After stacking the cakes, I frosted the outside of the cake and then added the "foam" on top using a large circular frosting tip. The handle, pretzels and circular happy birthday sign I made from a fondant gum paste mixture a few days earlier. The peanuts are real. The "beer" pouring into the can was just sugar, water and corn syrup that I heated up and then molded around another dowel.

All in all, I was pretty pleased with how cute this cake turned out and it had a great wow factor for all who saw it!