Showing posts with label cake decorating. Show all posts

Tuesday, April 24, 2012

Cars Cake: 2nd Birthday Cake


A few weeks ago I got to make a birthday cake for a cute 2 years old. After talking with his mom, I found out that he was really into toy cars and trucks. Searching around online, I found some excellent inspiration and quickly put this cake together.


I used a yellow cake mix in a 8x3 pan, which I torted and filled with frosting. The majority of the cake is covered in Wilton's Leaf Green tinted butter cream and the black fondant I purchased as a precut sheet. The "tunnel" on the front of the cake was made from a square of cake that was cut off the top when I was leveling.


I hope that Caden enjoyed his cake! I can't wait to see pictures!


Saturday, February 25, 2012

Filling a Cake: Step by step

Buy a leveler....they are cheap (!) and it will make the job sooooo much easier!
Fill a piping or ziploc bag with frosting, jam, pudding, or any other filling. Cut a wide opening in the bag.
Put a thick ring of the filling at the edge of the bottom layer.
Continue in circles, filling in the rest of the cake.
Smooth out the filling.
Add the top layer!

Quick and Easy: How to Fill a Piping Bag without making a mess

Use the tallest glass jar that you have to support the piping bag....then fill!

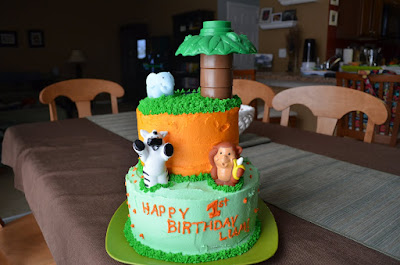
1st Birthday Cake for a cute birthday boy


Do you know what a smash cake is? Recently I have been to a lot of 1st birthday parties and one of the new trends is to have a special cake for the birthday boy or girl to "smash" apart and eat.

When my friend asked me to make a jungle themed birthday cake for her son's first birthday, I put together this fun cake and also made a small smash cake for the birthday boy!

The assembly of this cake was easy. The bottom layer was made by stacking two 8 inch rounds. The top layer was made by stacking two 6 inch rounds.I did use dowels in the bottom layer for some extra support since the cakes were so dense. The smash cake was a single 6 inch cake. The filling was chocolate buttercream and the frosting was regular buttercream tinted with wilton gel food coloring.

Thursday, December 1, 2011

Wedding Shower Cookies

One of my sisters got married this past summer and for one of her showers, my other sister and I made these cookies. I can't take any of the credit, my sister came up with the idea and I just helped execute, but they turned out so cute that I needed to share!!!

We tried to make a cake too....it fell apart....I mean literally fell apart.........don't know where we went wrong........

Wednesday, November 30, 2011

Beer Can Birthday Cake

For my husbands 30th birthday, I decided to put my cake decorating skills to the test. I looked around online for some ideas and found several different versions of a "beer can" cake.

Here is what the final version of the cake looked like:

My hubby really loved the cake and everyone who saw it was suprised that there was actually cake inside! It was really a lot easier to make than it looks. Just time consuming! I used a cake recipie from The Cake Doctor cookbook (I love this cookbook, every recipe that I have ever made comes out wonderfully!). I actually had to make a double batch and stacked the two cakes on top of each other. This was probably the hardest part of making the cake because I have never had to use dowels before in a cake, but needed to here because of the height of the cake and the fact that I had to transport it to the party (about a 30 minute car ride from my house....I aged about 10 years during this car ride....but thats another story). Since I had never used dowels in a cake before, I think that I probably overdid it. I think that I used 6 dowels.....anyone know if that was overkill????

After stacking the cakes, I frosted the outside of the cake and then added the "foam" on top using a large circular frosting tip. The handle, pretzels and circular happy birthday sign I made from a fondant gum paste mixture a few days earlier. The peanuts are real. The "beer" pouring into the can was just sugar, water and corn syrup that I heated up and then molded around another dowel.

All in all, I was pretty pleased with how cute this cake turned out and it had a great wow factor for all who saw it!